Categories
Digital Marketing Google Ads

Google Ads Search Campaign Structure for DTC Brands

These are the 3 core Search Campaigns needed when setting up Google Ads for your DTC brand.

CampaignDescription
Branded SearchThis campaign will target your brand keywords.
Generic SearchThis campaign will target your top performing unbranded keywords
Keyword ProspectingThis will be a Dynamic Keyword campaign. The goal of this campaign is to find new profitable unbranded keywords.

Common Settings

These settings will stay the same across all of your Campaigns.

SettingValue
ObjectiveSales
Conversion GoalPurchases
Campaign TypeSearch
Campaign Goal MethodWebsite Visits
Networks: Choose NetworksInclude Search Partners
Exclude Google Display Network
LocationsSelect your primary location

Campaign:
Branded Search

This campaign targets your Branded search terms. It is mostly defensive in nature: It prevents your competitors from bidding on your brand term cost effectively. This campaign will generate the majority of your conversions, but you want to keep your cost-per-acquisition costs low, as most of the sales generated by this campaign are not incremental sales.

SettingValue
Campaign NameSearch: Brand
Bidding
What do you want to focus on?
Where do you want your ads to appear?
Percent (%) impression share to target?
Maximum CPC bid limit?

Impression Share
Top of Results Page
90%
$1.00
Daily Budget$20.00 / day
(adjust to your level of comfort)

Ad Groups

This campaign initially contains only two ad groups: One to target the exact match version of your brand name, and another to target the phrase match version.

Ad Group NameKeywordsNegatives
Brand – exactYour primary brand term, exact match

eg: [nike]
None
Brand – phraseYour primary brand term plus product names closely related to your brand, phrase match

eg: “nike”, “air jordan”
Exclude the exact match brand term, targeted in the “Brand – exact” ad group above.

eg: [nike]

Campaign:
Generic Search

This campaign will target high-performing non-branded search terms. It will initially be empty, but you will populate it as you discover high performing search terms.

SettingValue
Campaign NameSearch: Generic
Bidding
What do you want to focus on?
Set a target return on ad spend

Conversion Value
200%
(adjust to your profit margins
and comfort levels)
Daily Budget$10.00 / day
(adjust to your level of comfort)

Eventually this campaign will contain one ad group for each performing exact match search term, as well as a second ad group with the phrase match version of the performing term.

Ad Groups

Ad Group NameKeywordsNegatives
Term A – exactA high-performing generic term related to your brand, exact match

eg: [running shoes]
None
Term A – phraseA high-performing generic term related to your brand, phrase match

eg: “running shoes”
Exclude the exact match term targeted by the ad group above.

eg: [running shoes]
Term X – exactAs you discover new performing keywords, create a new exact match ad group for them.

eg: [basketball shoes]
None
Term X – phraseAlso create a phrase-match version of the ad group.

eg: “basketball shoes”
Exclude the exact match term targeted by the ad group above.

eg: [basketball shoes]

Keyword Exclusions

Your Generic Search Campaign may target your Branded search terms. Create a Negative Keyword List containing your branded terms, and add it to the campaign to ensure this does not happen.

Campaign:
Keyword Prospecting

The goal of the Keyword Prospecting Campaign is to find new high performing keywords.

When such a keyword is found it should be:

  1. Added to the Generic Search Campaign
  2. Excluded from this Keyword Prospecting Campaign
SettingValue
Campaign NameSearch: Dynamic Prospecting
Bidding
What do you want to focus on?
Set a target cost per action?

Conversions
No
Daily Budget$10.00 / day
(adjust to your level of comfort)

Ad Groups

This campaign will have a single dynamic ad group called “Catch-all”, targeting all pages on the site.

Ad Group NameAd TargetsNegatives
Catch-all
[dynamic]
All WebpagesExclude all keywords already targeted by your Generic Search Campaign.

eg:
[running shoes]
[basketball shoes]

Keyword Exclusions

This campaign will also target your Branded terms unless you explicitly exclude them. Create a Negative Keyword List containing your branded terms and add the list to the campaign.

Multi Country / Currency / Language

If you are targeting multiple countries, currencies, and languages, then you will generally want to replicate this campaign structure for each Currency x Language combination.

Categories
Digital Marketing Google Ads

Negative Keyword Lists

These are the Negative Keyword Lists that every Google Ads account should have:

List NameDescription
Brand TermsContains phrase match versions of your brand name (including misspellings) as well as names of your key products that are closely associated with your brand.

Added to most of your campaigns, to funnel all branded searches into your branded campaigns.

Example
“nike”
“air jordan”
Global Exclude: IrrelevantContains exact and/or phrase match versions of terms that are irrelevant to your product or brand.

This keyword list is added to all campaigns.

Example
“used”
“fake”
“dress shoes”
Global Exclude: Too BroadContains usually only exact match versions of very broad terms that very broadly describe your product. Although relevant, they are too high up the funnel for most brands, and very unlikely to convert. Excluding these should generally reduce your costs without affecting your revenue.

This keyword list is added to all campaigns.

Example
[shoes]
CompetitorsContains phrase match versions of your competitor’s brands. For many brands, it is relatively difficult to convert on your competitor’s branded search, and so if you want to bid on your competitor’s terms, it makes sense to have dedicated campaigns for this purpose.

Added to most of your campaigns, to funnel all competitor searches into your competitor campaigns.

Example
“adidas”
“puma”
“new balance”

Categories
Analytics Facebook Ads

Facebook Ads Custom Column Setup

This custom column setup gives a good ROI focused review of your e-commerce campaigns and ad sets.

OrderColumn Name
1Object Names & Ids > Campaign Name
2Object Names & Ids > Ad Set Name
3Performance > Delivery
4Ad Relevance Diagnostics > Quality Ranking
5Performance > Attribution Setting
6Performance > Impressions
7Performance > Reach
8Performance > Clicks (All)
9Clicks > Outbound Clicks
10Performance > CTR (All)
11Clicks > Outbound CTR
12Conversions > Adds to Cart: Total
Deselect all sub-categories
13Conversions > Purchases: Total
Deselect all sub-categories
14Conversions > Purchases: Value
Deselect all sub-categories
15Conversions > Purchases: Cost
16Performance > Amount Spent
17Goal, Budget & Schedule > Budget
18Performance > Frequency
19Conversions > Purchase ROAS (Return on Ad Spend)
Deselect all sub-categories
  • Select “Save as Preset” and name your column set “ROAS”
  • Click the column icon and select “Set as Default”

Optional:
Custom Metrics

Columns > Customize Columns > Create Custom Metric

Optionally, create the following custom metric

Cost of Sales

The percentage revenue spent to acquire a sale. This is a more business centric metric than ROAS, and is simpler to understand at a glance if a particular campaign is profitable or not.

NameCost of Sales
FormatPercentage
DescriptionAd spend as a % of revenue.
FormulaAmount Spent ÷ Purchases Conversion Value
Who can access thisEveryone
Categories
Digital Marketing Google Ads

Device Bid Adjustments for Google Ads

Conversion rates can vary a great deal across devices, and so it makes sense to bid differently for Mobile vs Desktop vs Tablet. Here two methods to calculate your bid adjustment, as well as an automated bidding script that will do all the work for you!

Calculating based on Conversion Rates

The simplest way is to calculate bid adjustments based on the individual device conversion rates relative to the Campaign average

Calculating based
on Click Value

I believe a more correct way is to calculate bid adjustments based on the relative per click values of each device (the Conv. Value / Click column)

Example Using Real Data

Sample Campaign

DeviceConv. rateConv. value / clickAdjustment
(Conv. Rate)
Adjustment
(Click Value)
Mobile1.15%$6.90-40%-43%
Desktop3.01%$20.20+57%+68%
Tablet0.89%$1.85-54%-85%
Campaign1.91%$12.03

Automating Bid Adjustments

Below is a Google Ads Script that will automatically make these adjustments for you (based on relative conversion rate). You can download the latest version of this script on GitHub here:
Google Ads Device Bid Adjustment Script

// Version: 1.13.1 Muppet
// Latest Source: https://github.com/Czarto/Adwords-Scripts/blob/master/device-bid-adjustments.js
//
// This Google Ads Script will incrementally change device bid adjustments
// based on conversion rates using the Campaign's average conversion rate
// as a baseline.
//

/***********

MIT License

Copyright (c) 2016-2021 Alex Czartoryski

Permission is hereby granted, free of charge, to any person obtaining a copy
of this software and associated documentation files (the "Software"), to deal
in the Software without restriction, including without limitation the rights
to use, copy, modify, merge, publish, distribute, sublicense, and/or sell
copies of the Software, and to permit persons to whom the Software is
furnished to do so, subject to the following conditions:

The above copyright notice and this permission notice shall be included in all
copies or substantial portions of the Software.

THE SOFTWARE IS PROVIDED "AS IS", WITHOUT WARRANTY OF ANY KIND, EXPRESS OR
IMPLIED, INCLUDING BUT NOT LIMITED TO THE WARRANTIES OF MERCHANTABILITY,
FITNESS FOR A PARTICULAR PURPOSE AND NONINFRINGEMENT. IN NO EVENT SHALL THE
AUTHORS OR COPYRIGHT HOLDERS BE LIABLE FOR ANY CLAIM, DAMAGES OR OTHER
LIABILITY, WHETHER IN AN ACTION OF CONTRACT, TORT OR OTHERWISE, ARISING FROM,
OUT OF OR IN CONNECTION WITH THE SOFTWARE OR THE USE OR OTHER DEALINGS IN THE
SOFTWARE.

**********/

var LABEL_PROCESSING_DESKTOP = "_processing_desktop";
var LABEL_PROCESSING_MOBILE = "_processing_mobile";
var LABEL_PROCESSING_TABLET = "_processing_tablet";

var BID_INCREMENT = 0.05;       // Value by which to adjust bids
var MIN_CONVERSIONS = 10;       // Minimum conversions needed to adjust bids.
var MAX_BID_ADJUSTMENT = 1.90;  // Do not increase adjustments above this value


function main() {
    initLabels(); // Create Labels

    /*****
      Device performance *should* theoretically not vary over time
      (unless a site redesign has been performed) and so it makes
      most sense to use a relatively long time period (1 year)
      on which to base adjustments.

      Shorter time periods included for reference, but commented out
    *****/

    //setDeviceBidModifier("LAST_7_DAYS");
    //setDeviceBidModifier("LAST_14_DAYS");
    //setDeviceBidModifier("LAST_30_DAYS");
    //setDeviceBidModifier(LAST_90_DAYS(), TODAY());
    setDeviceBidModifier(LAST_YEAR(), TODAY());

    cleanup(); // Remove Labels
}


//
// Set the Processing label
// This keeps track of which bid adjustments have already been processed
// in the case where multiple time-lookback windows are being used
//
function initLabels() {
    checkLabelExists();
    cleanup();

    var itemsToLabel = [AdWordsApp.campaigns(), AdWordsApp.shoppingCampaigns()];

    for (i = 0; i < itemsToLabel.length; i++) {
        var iterator = itemsToLabel[i].get();

        while (iterator.hasNext()) {
            campaign = iterator.next();
            campaign.applyLabel(LABEL_PROCESSING_DESKTOP);
            campaign.applyLabel(LABEL_PROCESSING_MOBILE);
            campaign.applyLabel(LABEL_PROCESSING_TABLET);
        }
    }
}


//
// Create the processing label if it does not exist
//
function checkLabelExists() {

    var labels = [LABEL_PROCESSING_DESKTOP, LABEL_PROCESSING_MOBILE, LABEL_PROCESSING_TABLET];

    for (i = 0; i < labels.length; i++) {
        var labelIterator = AdWordsApp.labels().withCondition("Name = '" + labels[i] + "'").get();
        if (!labelIterator.hasNext()) {
            AdWordsApp.createLabel(labels[i], "AdWords Scripts label used to process device bid adjustments");
        }
    }
}


//
// Remove Processing label
//
function cleanup() {
    var cleanupList = [AdWordsApp.campaigns(), AdWordsApp.shoppingCampaigns()];

    for (i = 0; i < cleanupList.length; i++) {
        var iterator = cleanupList[i].get();

        while (iterator.hasNext()) {
            campaign = iterator.next();
            campaign.removeLabel(LABEL_PROCESSING_DESKTOP);
            campaign.removeLabel(LABEL_PROCESSING_MOBILE);
            campaign.removeLabel(LABEL_PROCESSING_TABLET);
        }
    }
}


//
// Set Device Bids
//
function setDeviceBidModifier(dateRange, dateRangeEnd) {

    var STANDARD = 0;
    var SHOPPING = 1;

    for (i = 0; i < 2; i++) {
        //Logger.log('---  ' + (i==STANDARD ? 'Standard Campaigns' : 'Shopping Campaigns'));

        var labels = [LABEL_PROCESSING_DESKTOP, LABEL_PROCESSING_MOBILE, LABEL_PROCESSING_TABLET];

        for (l = 0; l < labels.length; l++) {
            //Logger.log('     ' + labels[l]);

            var campaigns = (i==STANDARD ? AdWordsApp.campaigns() : AdWordsApp.shoppingCampaigns());
            var campaignIterator = campaigns.forDateRange(dateRange, dateRangeEnd)
                .withCondition("Status = ENABLED")
                .withCondition("Conversions >= " + MIN_CONVERSIONS)
                .withCondition("LabelNames CONTAINS_ANY ['" + labels[l] + "']")
                .get();

            while (campaignIterator.hasNext()) {
                var campaign = campaignIterator.next();
                var baseConversionRate = campaign.getStatsFor(dateRange, dateRangeEnd).getConversionRate();
                var platforms = [campaign.targeting().platforms().desktop(),
                    campaign.targeting().platforms().mobile(),
                    campaign.targeting().platforms().tablet()
                ];

                //Logger.log('    CAMPAIGN: ' + campaign.getName());

                var targetIterator = platforms[l].get();
                if (targetIterator.hasNext()) {
                    var target = targetIterator.next();
                    var stats = target.getStatsFor(dateRange, dateRangeEnd);
                    var conversions = stats.getConversions();
                    var conversionRate = stats.getConversionRate();
                    var targetModifier = (conversionRate / baseConversionRate);
                    var currentModifier = target.getBidModifier();

                    //Logger.log('    Conversions: ' + conversions);
                    
                    if (conversions >= MIN_CONVERSIONS) {
                        if (Math.abs(currentModifier - targetModifier) >= BID_INCREMENT) {
                            if (targetModifier > currentModifier) {
                                target.setBidModifier(Math.min(currentModifier + BID_INCREMENT, MAX_BID_ADJUSTMENT));
                            } else {
                                target.setBidModifier(Math.max(currentModifier - BID_INCREMENT, 0.1));
                            }
                        }

                        campaign.removeLabel(labels[l]);
                        //Logger.log('    Remove Label: ' + labels[l]);
                    }
                }

            }
        }
    }
}

//
// Date range helper function
// Returns today's date
//
function TODAY() {
    var today = new Date();
    var dd = today.getDate();
    var mm = today.getMonth() + 1; //January is 0!
    var yyyy = today.getFullYear();

    return { year: yyyy, month: mm, day: dd };
}

//
// Date range helper functions
// Returns date 90 days ago
//
function LAST_90_DAYS() {
    var date = new Date(); 
    date.setDate(date.getDate() - 90);
    
    var dd = date.getDate();
    var mm = date.getMonth()+1; //January is 0!
    var yyyy = date.getFullYear();
  
    return {year: yyyy, month: mm, day: dd};
  }

//
// Date range helper functions
// Returns date 1 year ago
//
function LAST_YEAR() {
    var today = TODAY();

    today.year = today.year - 1;
    return today;
}

The latest version of this script is available on GitHub here:
Google Ads Device Bid Adjustment Script

Install the script and have it run once per week.

Every week, the script will look at the past 365 days of data for each of your Search and Shopping campaigns, and make device bid adjustments based on conversion rates.

The script will raise and lower your device bid adjustments by up to 5% each week (you can change this value if you prefer bigger adjustments). You can also adjust the date range for which you want the script to run, and what the minimum number of conversions are required to make a change.

Additional Resources

Categories
Digital Marketing Facebook Ads Google Ads

Adjusting Campaign Budgets towards a Target ROAS

Pop Quiz!

You have been running a campaign for 7 days with a daily budget of $50. Over those 7 days you have spent $350 with an ROAS of 1500%. You are using a “Maximize ROAS” bid strategy, and want to hit an ROAS of 2000%.

What should your daily budget be?

Here is the formula:

Formula to adjust budget towards a target ROAS
Formula for adjusting a budget towards a target ROAS

This formula calculates what your daily spend should have been to hit your target ROAS. Although there are no guarantees that future performance will be the same as past performance, it does provide a baseline from which to work.

If you are running a smart bidding campaign in either Google Ads or Facebook Ads, and are aiming for a target Return on Ad Spend (ROAS), this is a great formula to use for adjusting your budgets.

The Answer

Sample Campaign
Total Cost$50×7 = $350
# of Days7
Current ROAS1500%
Target ROAS2000%

Using the formula above we get:

New Daily Budget = $350 ÷ 7 × 1500 ÷ 2000 = $37.50

By reducing our budget from $50 to $37.50, we should be in better shape to hit our target ROAS of 2000%.

Related Reading

Categories
Analytics Digital Marketing Google Ads

Essential Google Ads Custom Columns

Here are some incredibly useful custom columns that every account should have:

Column NameFormulaType
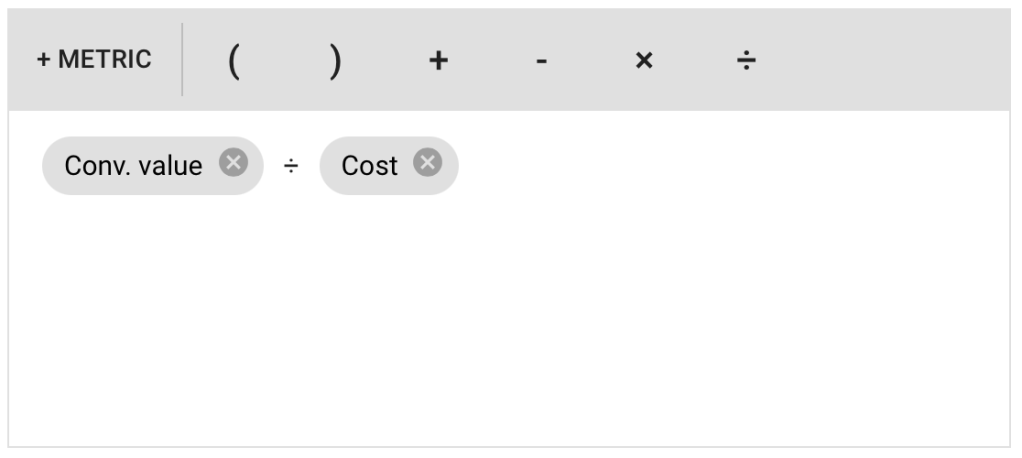
ROASConv. Value ÷ Cost%
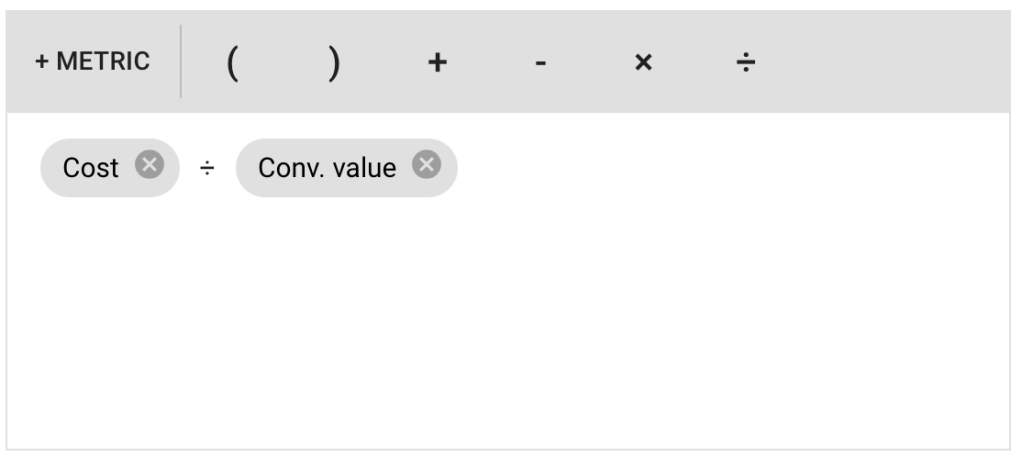
Cost of Sales (COS)Cost ÷ Conv. Value%
% COS CPCConv. Value ÷ Clicks x %$
Optimistic
% COS CPC
(Conv. Value + (Conv. Value ÷ Conversions)) ÷ Clicks x %$

ROAS

Return On Ad Spend — It is surprising that this column doesn’t exist by default, since Google provides target ROAS based bidding strategies.

NameROAS
DescriptionReturn on Ad Spend
FormulaConv. Value ÷ Cost
Data FormatPercent (%) or Money ($)

This metric tells you how much sales are generated for each dollar in ad spend.

  • 100% ROAS: For every $1 spent, you generated $1 in revenue.
  • 200% ROAS: For every $1 spent, you generated $2 in revenue.

Many of the automated bidding strategies in Google Ads let you specify a target ROAS goal, so this custom column allows you to see at a glance if your campaigns, ad groups, and keywords are hitting your ROAS targets.

COS (Cost of Sales)

COS stands for Cost Of Sales

NameCOS
DescriptionCost of Sales
FormulaCost ÷ Conv. Value
Data FormatPercent (%)

This metric is the inverse of ROAS and it displays ad spend as a percentage of revenue. Cost of sales is a very intuitive metric when comparing against your profit margins. If you know your profit margins, then it’s easy to see when your Cost of Sales exceeds those margins, and when you start to lose money on every sale.

  • 20% Cost of Sales: For every $1 in revenue, we spent $0.20 on ads.

To convert between ROAS and COS use these formulas:

Cost of Sales (COS) = 1 / ROAS

Return on Ad Spend (ROAS) = 1 / COS

% COS CPC

What is the max Cost per Click bid that will keep me below the specified % Cost of Sales target.

Name5% COS CPC
DescriptionMaximum CPC to stay below 5% Cost of Sales
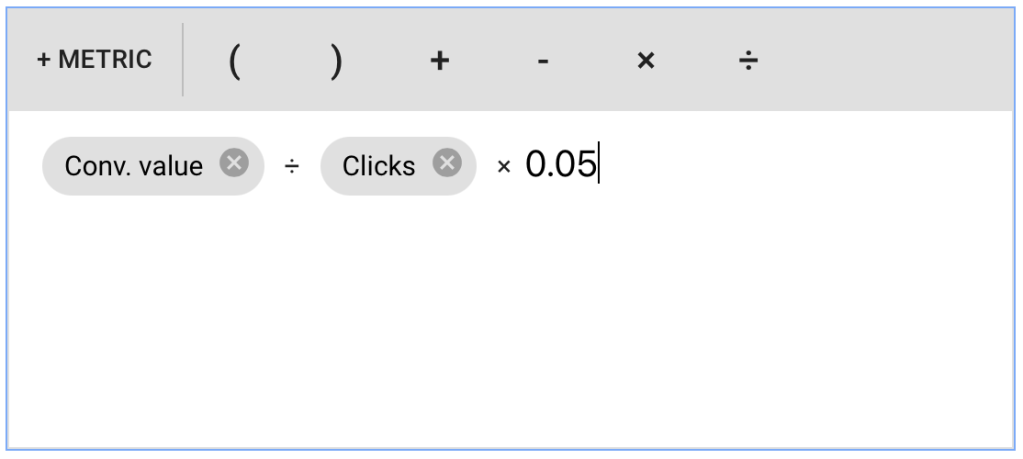
FormulaConv. Value ÷ Clicks x 0.05
Data FormatMoney ($)

If you use Manual CPC bidding for a campaign, creating a few of these columns for various profit margins will give you access to quick calculation for your max CPC bids.

Eg:

5% COSMax CPC bid to hit 5% cost of sales
35% COSMax CPC bid to hit 35% cost of sales
55% COSMax CPC bid to hit 55% cost of sales

The number of columns you create and the values you use will depends on your business and profit margins. Create one column for some typical cost targets.

Optimistic % COS CPC

What is the max Cost per Click bid that will keep me below the specified % Cost of Sales target, under the assumption that the next click will result in a sale

NameOptimistic 5% COS CPC
DescriptionMaximum CPC to stay below 5% Cost of Sales, assuming the next click will result in a sale
Formula(Conv. Value + (Conv. Value ÷ Conversions)) ÷ Clicks x 0.05

or use a harde-coded order value:
(Conv. Value + avg_order_value) ÷ Clicks x 0.05
Data FormatMoney ($)

This custom column is similar to the % COS CPC column above, except that it is optimistic in assuming that the “next click” will result in a sale, and includes the next sale’s revenue in the Max cost per click calculations.

You can either hard-code your average conversion value, or you can calculate it based on past conversion data.

This column is useful when you are starting a new campaign where you don’t have much conversion data yet, and you want to be optimistic with your bidding.

Further Reading

Categories
Digital Marketing Google Ads Shopify Shopping

Enhance Shopify’s Google Shopping feed

The following script will allow you to enhance Shopify’s Google Shopping app feed to include:

  • Additional Images by Variant: More control over which product images get associated with which variant.
  • Exclude Out of Stock items from Google Programs. If you are paying to advertise, make sure you are only paying to display products you can sell.
  • Exclude Low Stock variants from Google Programs. Exclude color ways that have low size options. Show other color options or products instead.
  • GTIN: Optionally set GTIN to be your barcode value
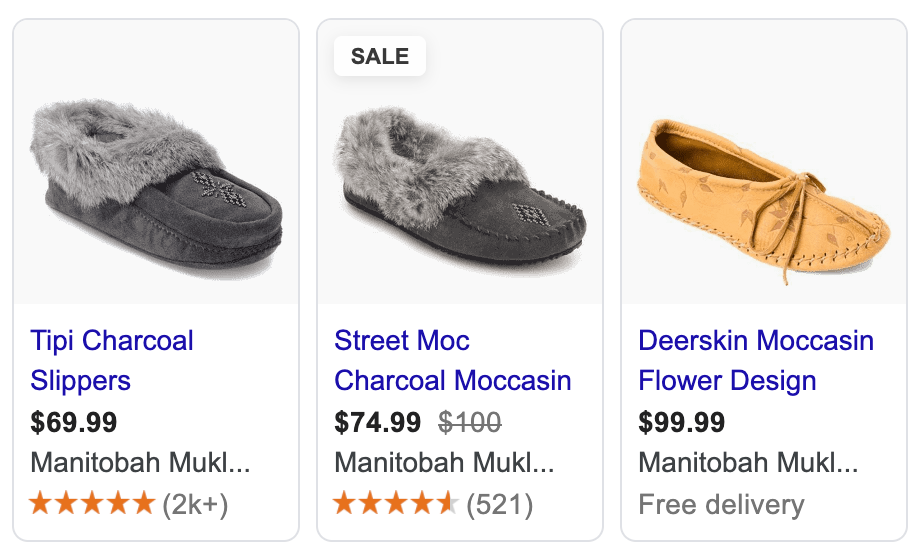
Sale annotation in Google Shopping
SALE labels and price markdown annotations usually only appear if you provide Google Shopping with both your regular price (compare_at_price) and your sale price.

To add the above functionality, you must create and upload a supplemental data feed to Google Merchant Center.

Step 1
Create a Supplemental Data Feed in Shopify

The first step is to create a data feed in Shopify. We can accomplish this by creating a custom Shopify Collection Template that will output XML data instead of HTML:

1. Create a new Collection Template called collection.google-update.liquid with the following code:

{% layout none %}<?xml version="1.0"?>
<rss xmlns:g="http://base.google.com/ns/1.0" version="2.0">

{% comment %}
Google Shopping / Merchant Center + Shopify Product Update Feed by Alex Czartoryski
https://business.czarto.com/2020/10/14/enhance-shopify-google-shopping/

This version: Aug 30, 2022
The latest version of this script available here:
https://github.com/Czarto/ShopifyScripts/blob/master/Templates/collection.google-feed-update.liquid

TODO: Test & handle products without variants
TODO: Test & hanlde products without color
TODO: Specify Sizes to never exclude. eg: Women's 7,8
{% endcomment %}

{% comment %} Settings {% endcomment %}
{%- assign exclude_unavailable_variants = true -%}
{%- assign exclude_variant_colors_with_limited_availability = false -%}
{%- assign ignore_x_smallest_sizes = 1 -%}
{%- assign ignore_x_largest_sizes = 1 -%}
{%- assign minimum_percentage_availability = 50 -%}
{%- assign filter_variantImages_byColor = false -%}
{%- assign use_barcode_as_gtin = false -%}

{%- comment -%}
TODO: Move this into a snippet and use capture to assign the variable
{%- endcomment -%}}
{%- case shop.currency -%}
{%- when 'USD' -%}{%- assign CountryCode = 'US' -%}
{%- when 'CAD' -%}{%- assign CountryCode = 'CA' -%}
{%- when 'GBP' -%}{%- assign CountryCode = 'GB' -%}
{%- when 'AUD' -%}{%- assign CountryCode = 'AU' -%}
{%- else -%}{%- assign CountryCode = 'US' -%}
{%- endcase -%}

<channel>
<title>{{ shop.name }} {{ collection.title | strip_html | strip_newlines | replace: '&', '&amp;' }}</title>
<link>{{ shop.url }}</link>
<description>{{ collection.description | strip_html | strip_newlines | replace: '&', '&amp;' }}</description>

{%- paginate collection.products by 1000 -%}
{%- for product in collection.products -%}

    {%- comment -%} Get color option {%- endcomment -%}
    {%- for option in product.options -%}
      {%- if option == 'Color' -%}{% capture option_color %}option{{ forloop.index }}{% endcapture %}{%- endif -%}
    {%- endfor -%}

    {%- comment -%} Make a list of Colors to exclude {%- endcomment -%}
    {%- assign colors_to_exclude = "" -%}
    {%- if exclude_variant_colors_with_limited_availability -%}
        {%- for color in product.options_by_name['Color'].values -%}
            {%- assign variants = product.variants | where: option_color, color -%}
            {%- assign variants_to_process_count = variants.size | minus:ignore_x_smallest_sizes | minus:ignore_x_largest_sizes -%}
            {%- assign available_count = 0 -%}
            {%- assign total_processed_count = 0 -%}
            {%- for variant in variants offset:ignore_x_smallest_sizes limit:variants_to_process_count -%}
                {%- assign total_processed_count = total_processed_count | plus:1 -%}
                {%- if variant.available -%}{%- assign available_count = available_count | plus:1 -%}{%- endif -%}
            {%- endfor -%}
            {%- if total_processed_count == 0 -%}
              {%- continue -%}
            {%- endif -%}
            {%- assign percentage_availability = available_count | times: 100.0 | divided_by: total_processed_count | round -%}
            {%- if percentage_availability < minimum_percentage_availability -%}
            {% capture colors_to_exclude %}{{colors_to_exclude}}#{{ color }}{%endcapture%}
            {%- endif -%}
        {%- endfor -%}
        {%- assign colors_to_exclude = colors_to_exclude | split: "#" -%}
    {%- endif -%}

    {%- for variant in product.variants -%}
<item>
    <g:item_group_id>shopify_{{ CountryCode }}_{{ product.id }}</g:item_group_id>
    <g:id>shopify_{{ CountryCode }}_{{ product.id }}_{{ variant.id }}</g:id>
    <g:mpn>{{ variant.sku }}</g:mpn>
    <g:barcode>{{ variant.barcode }}</g:barcode>
    {% if use_barcode_as_gtin %}<g:gtin>{{ variant.barcode }}</g:gtin>{% endif %}

    {%- comment -%} Additional Images by Color {%- endcomment -%}
    {%- assign additional_images = product.images -%}
    {%- for option in product.options -%}
    {%- if option == 'Color' -%}{% capture variant_color %}{{ variant.options[forloop.index0] }}{% endcapture %}{%- endif -%}
    {%- endfor -%}
    {% if filter_variantImages_byColor %}{% assign additional_images = product.images | where: "alt", variant_color | sort: 'attached_to_variant' | reverse%}{% endif %}
    {% if additional_images.size > 1 %}{%- for image in additional_images offset:1 limit:10 -%}
    <g:additional_image_link>https:{{ image.src | product_img_url: 'master' }}</g:additional_image_link>
    {% endfor %}{% endif %}

    {%- comment -%} Exclude Out of Stock Variants {%- endcomment -%}
    {% if exclude_unavailable_variants and variant.available == false %}
    <g:pause>ads</g:pause>
    {% elsif exclude_variant_colors_with_limited_availability and colors_to_exclude contains variant_color %}
    <g:pause>ads</g:pause>
    {% endif %}
</item>

  {% endfor %}
{% endfor %}
{% endpaginate %}
</channel>
</rss>

Available on github here

2. Create a new collection called “google-update” and choose google-update as your collection template.

3. Preview the collection and copy the url. Your url should look something like this: yourstoredomain.com/collections/google-update

Step 2
Configure your Feed

There are a few options you can configure in your feed, all located towards the top of your template file in the “configuration” section.

Exclude Out of Stock Variants
exclude_unavailable_variants

true
Exclude Limited Stock Color Variants
exclude_variant_colors_with_limited_availability
ignore_x_smallest_sizes
ignore_x_largest_sizes
minimum_percentage_availability

false
1
1
50
Filter Variant Images by Color + Alt Text Matching
filter_variantImages_byColor

false
Set GTIN to Variant’s Barcode Value
use_barcode_as_gtin

false

Exclude Out of Stock Variants

exclude_unavailable_variants = true

By default, any variants that are out of stock will be excluded from Google Shopping, Google Shopping Actions, and Dynamic Remarketing. Change the value of exclude_unavailable_variants = false if you want to disable this behaviour.

Exclude Limited Stock Color Variants

exclude_variant_colors_with_limited_availability = true

This setting is intended for apparel products, where you may have many colors of a product, but limited sizes available in a specific product. Setting this value to true will cause the script to attempt to exclude the colors with low availability (so that alternative colors or products can show instead).

There are a few additional configuration items for this setting that you can change:

minimum_percentage_availability
default = 50
Minimum % of sizes available before all variants of this color are excluded.
ignore_x_smallest_sizes
default = 1
Ignore the x smallest sizes in the % available calculation
ignore_x_largest_sizes
default = 1
Ignore the x largest sizes in the % available calculation

Filter Variant Images by Color
and Alt Text Matching

filter_variantImages_byColor = true

Setting this value to true will assign additional images to the current variant where the image’s Alt Text matches the variant’s color. Note that the primary variant’s image will always be included in the feed regardless of Alt text.

Set GTIN to Variant’s Barcode Value

use_barcode_as_gtin = true

Setting this value to true will assign your barcode value to GTIN. If you would like the option to set a different value than Barcode, it should be pretty straightforward to edit the code.

Step 3
Add a Supplemental Data Feed in Google Merchant Center

1. Open Merchant Center and go to
Products > Feeds > Supplemental Feeds > Add Supplemental Feed

NameFeed Update Script
Feed TypeScheduled Fetch
File Namegoogle-update
File Urlyourstoredomain.com/collections/google-update

Leave everything else as default values and click Continue

2. Make sure there’s a checkmark beside Content API and click Create Feed

3. You should now see your newly created feed in the Supplemental Feeds section. Click on your feed’s name and then click on Fetch Now to update your product data now.

Testing

It may take up to 30 minutes for your main feed to be updated. It is a good idea to review your products and feed to ensure that everything is coming through as expected, and tweak as required.

If everything looks good, your new sale pricing, variant images, and program availability should now be updated once per day.

Related Reading

Categories
Attribution Digital Marketing eCommerce Google Ads Shopify

Optimize Shopify’s Google Ads Conversion Tracking

Here are some essential changes to make to your Google Ads conversion tracking after you connect Shopify’s Google Shopping Channel.

STEP 0
Install the Google Shopping Channel

This guide assumes that you have the Google Shopping Channel installed on your Shopify store. If this is not the case, then:

  1. Install the Google Shopping Channel
  2. Connect your Google Account (must be an account that has access to both Google Merchant Center and Google Ads)
  3. Connect your Google Ads Account in the “Smart Shopping campaign” section

STEP 1
Remove Old Conversion Tracking Code

By connecting Shopify to Google Ads via the Google Shopping Channel, Shopify will begin sending conversion data to your Google Ads account. If you were already tracking conversions in Google Ads, then you need to make sure you are not duplicating your conversion data:

  • If you previously had a Google Ads conversion tracking script installed in your checkout, then remove that code.
  • If you were importing conversions from Google Analytics, stop importing those conversions.

STEP 2
Fix Conversion Categories

Log into Google Ads and then Go to
Tools & Settings > Measurement > Conversions

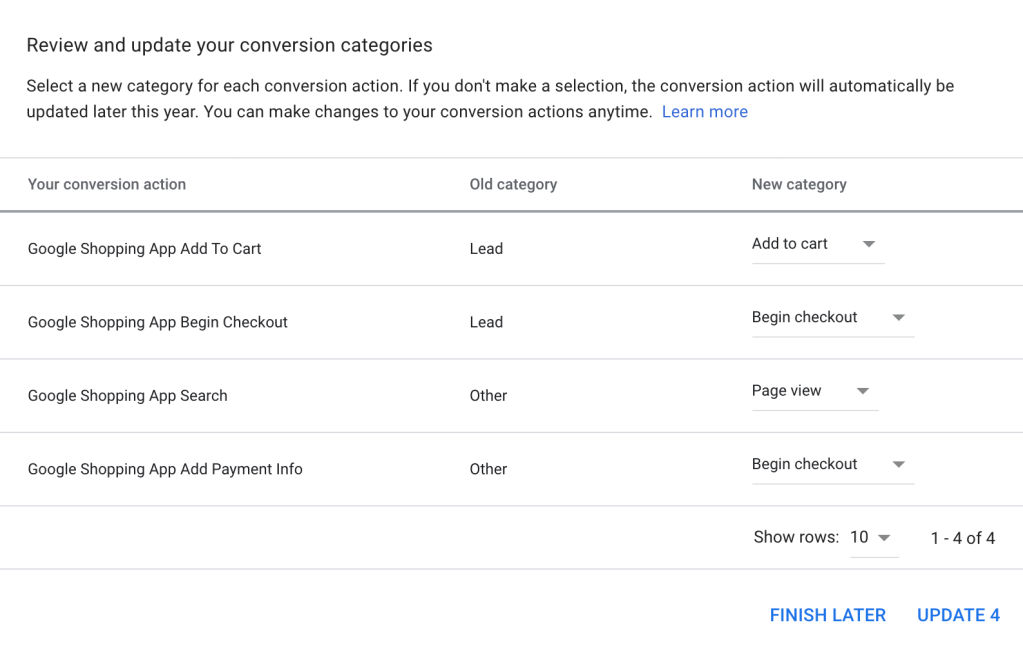
You should see a bunch of new conversion actions created by Shopify. You will also see a warning that your conversion categories are out of date, and that you should update 4 of your conversions actions.

Click Update Now and update the settings to the following:

STEP 3
Conversion Windows and Attribution Models

Although Shopify created multiple conversion actions, you only need to worry about the Google Shopping App Purchase conversion event.

Click on the Google Shopping App Purchase conversion action and update the following settings:

Old ValueNew Value
CountEvery ConversionOne
View-through Conversion Window30 days1 day
Attribution ModelLast clickLinear

One Conversion per click

If you count “Every Conversion” you increases the risk of double attribution across your various channels.

For example: A user clicks on your Google ad and makes a purchase. It makes sense to count and attribute this conversion to Google Ads. If this same user later receives your newsletter, and purchases again, then you probably want to attribute that sale to the Newsletter and NOT to Google. Setting conversion count to “One” instead of “Every” ensures that only the first sale gets attributed to google, and not the second.

Counting “Every” conversion increases the risk of double attribution

Click-Through Conversions

Arguably, you should set your Click-Through Conversion window to 30 days. 90 days seems extremely long, and could increases your chances of double attribution across multiple sales channels.

However, if you are using Smart Campaigns or Smart Bidding, the bidding algorithm can only take into account conversions that have occurred within the specified conversion window. So theoretically, the longer your conversion window, the more data for Smart Bidding to optimize with. So the 90 day click-conversion window can probably stay.

View-Through Conversions

Set the View-Through Conversion window to only 1 day. A longer View-Through conversion window is dangerous, and will lead to over attributing sales to Display Remarketing, YouTube, and Smart Shopping. This will invariably cause you to overspend on those campaigns.

A View-Through conversion window greater than 1 day is dangerous, and will lead to over attributing sales to undeserving channels.

Which Attribution Model to use?

Linear, Time Decay, Position Based, or Data Driven are all better than First or Last click, as they allow you to attribute sales across a wider range of ad interactions, which allows you to spend more evenly across your entire funnel.

I personally usually choose Linear or Position Based, as I like pushing more attribution (and therefore spend) into the top part of the funnel.

STEP 4
Enhanced Conversion Tracking

This option is still in beta, and so you may or may not have access to this in your account. At the bottom of your Purchase conversion action, you should see a section called “Enhanced Conversions”

Expand this section and enter the following settings:

  • Turn on Enhanced Conversions
  • Enter your site URL (ideally your order receipt / thank you page)
  • Choose the Global Site Tag
  • Select “Enter Javascript or CSS Selectors” (note that all of the below are case sensitive. So the first “S” of Shopify needs to be capitalized, and the remaining characters need to be lower case)
  • Email: Javascript: Shopify.checkout.email
  • Phone: Javascript: Shopify.checkout.phone
  • Name and Address: Javascript:
    • Shopify.checkout.billing_address.first_name
    • Shopify.checkout.billing_address.last_name
    • Shopify.checkout.billing_address.address1
    • Shopify.checkout.billing_address.city
    • Shopify.checkout.billing_address.province_code
    • Shopify.checkout.billing_address.country_code
    • Shopify.checkout.billing_address.zip

Click Save

Further Reading

Categories
Analytics Shopify

sag_organic and product_sync in Google Analytics

Last Updated: December 5, 2023

If you install the Google sales channel on Shopify, you may notice a rise in strange referrals in your Google Analytics reports.

Medium = product_sync and Campaign = sag_organic

Where do sag_organic and product_sync come from?

When the Google sales channel uploades your product feed to Google Merchant Center, it appends the following UTM tags to the product url:

UTM TagValue
utm_sourcegoogle
utm_mediumproduct_sync
utm_campaignsag_organic
utm_contentsag_organic

The following querystring is appended to your product’s link url:

&utm_medium=product_sync&utm_source=google&utm_content=sag_organic&utm_campaign=sag_organic

Why do we need these UTM parameter?

Today, you no longer need these UTM tags and you should remove them from your product urls.

These UTM parameters were created by Shopify to track organic free traffic from Google Shopping. They were meant to distinguish between organic traffic from Shopping vs organic traffic from Search.

Although well intentioned, this implementation altered the default behavior of Google Analytics, which was unexpected and not desirable.

Another issue with the Shopify implementation is that they didn’t include a canonical link in the feed. A canonical link ensures that only the “clean” version of the product link (without UTM tags) is included in Google’s search index. Without this, there is a risk that your organic search traffic will also include these UTM tags (which will really mess up your analytics).

What does sag_organic mean?

SAG stands for Surfaces Across Google.

Surfaces Across Google was the original “free shopping listings” in Google. It has since been renamed to “free shopping listings” and the name “SAG” is no longer used.

Fixing your Product Urls

If you set up Auto-Tagging correctly in both Google Ads and Google Merchant Center, Google Analytics will accurately separate Paid and Organic Shopping traffic.

Step 1
Remove the UTM tags

To remove the UTM parameters from your Product Links

  1. Go to Merchant Center > Products > Feeds
  2. Click on the Content API feed
  3. Click on the Feed Rules tab
  4. Click the big blue PLUS + button, type link in the field, and select link from the drop down.
  5. For Data Source, select Set to, type link and select link from the Primary Feed: Content API list.
  6. Click OK
  7. Set the default behaviour if the link is blank to “Leave Blank”
  8. Now go to Modifications > Add Modification
  9. Choose Optimize URL > Set Parameter
FunctionParameter Name
Remove Parameterutm_source
Remove Parameterutm_medium
Remove Parameterutm_campaign
Remove Parameterutm_content
  1. Click OK and look in the right side column preview to see if the link has been properly updated.
  2. Click Save as Draft and Apply

Step 2
Set your Canonical Link

“If you use tracking parameters in your link attributes, it is recommend that you use the canonical_link attribute to provide a canonical URL. Use the canonical_link attribute to ensure that products are associated with the correct URL in the Google Search index.”

Google Merchant Center Help
https://support.google.com/merchants/answer/188492?hl=en

To ensure that only the “clean” non-utm version of the product link is included in Google’s search index, follow these steps.

  1. Go to Merchant Center > Products > Feeds
  2. Click on the Content API feed
  3. Click on the Feed Rules tab
  4. Click the big blue PLUS + button to add a new Rule and type canonical and choose canonical link from the drop down.
  5. For Data Source, select Set to, type link and select link from the Processed Attributes list.
  6. Click OK
  7. Change the default behaviour if canonical_link has no value to “leave blank”
  8. Add Modification > Find and Replace
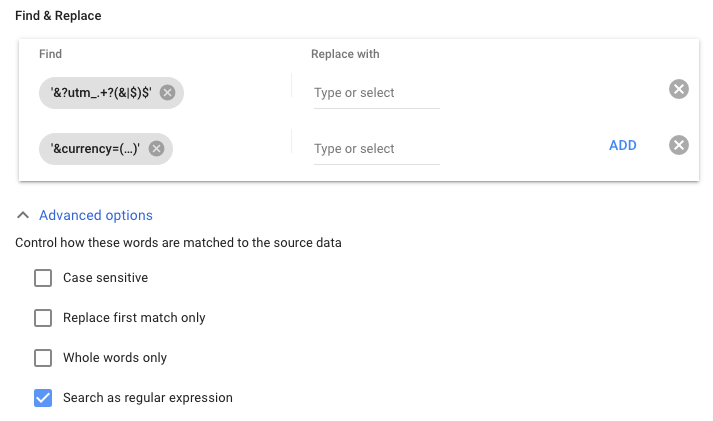
    Now add two Find & Replace operations: One to remove the UTM tags and another to remove the Currency parameter
#FindReplaceAdvanced
1&?utm_.+?(&|$)$(leave blank)Search as regular expression
2&currency=(…)(leave blank)Search as regular expression
  1. Click OK and confirm in the right side column preview that the new link looks nice and clean, without any parameters appended.
  2. Click Save as Draft and Apply
Your canonical feed rules should look something like the above

Step 3
Configure Auto-Tagging

This will configure Google Ads and Google Merchant Center to properly tag your product urls.

  1. Google Ads (in the left hand menu)
    Settings > Account Settings > Auto Tagging: ON
  2. Google Merchant Center:
    Gear Icon > Conversion Settings > Auto Tagging: ON
  3. Google Analytics:
    Property Settings > Advanced Settings > Allow Manual Tagging to Override: OFF

Done!

You may need to wait a few hours for your feed to update with the new values. You should now have the default vanilla setup that Google Analytics expects.

Categories
Digital Marketing Google Ads Shopify Shopping

Add Sale Price to Shopify’s Google Shopping feed

DEPRECATED: As of at least Aug 30, 2022, the defautlt Google sales channel properly sends the product’s sale price to Google. This post and code are no longer being maintained, and are here only for reference.

Sale annotation in Google Shopping
SALE labels and price markdown annotations usually only appear if you provide Google Shopping with both your regular price (compare_at_price) and your sale price.

Create a Price Feed in Shopify

The first step is to create a data feed in Shopify containing your products sale and regular prices. We can accomplish this by creating a custom Shopify Collection Template that will output XML data instead of HTML:

1. Create a new Collection Template

{% layout none %}<?xml version="1.0"?>
<rss xmlns:g="http://base.google.com/ns/1.0" version="2.0">
{% paginate collection.products by 1000 %}
{%- case shop.currency -%}
{%- when 'USD' -%}{%- assign CountryCode = 'US' -%}
{%- when 'CAD' -%}{%- assign CountryCode = 'CA' -%}
{%- when 'GBP' -%}{%- assign CountryCode = 'GB' -%}
{%- when 'AUD' -%}{%- assign CountryCode = 'AU' -%}
{%- else -%}{%- assign CountryCode = 'US' -%}
{%- endcase -%}
<channel>
<title>{{ shop.name }} {{ collection.title | strip_html | strip_newlines | replace: '&', '&amp;' }}</title>
<link>{{ shop.url }}</link>
<description>{{ collection.description | strip_html | strip_newlines | replace: '&', '&amp;' }}</description>
{% for product in collection.products %} 
  {% for variant in product.variants %}
    {%- if variant.compare_at_price > variant.price -%}
      {%- assign OnSale = true -%}
      {%- assign Price = variant.compare_at_price -%}
      {%- assign SalePrice = variant.price -%}
        <item>
            <g:item_group_id>shopify_{{ CountryCode }}_{{ product.id }}</g:item_group_id>
            <g:id>shopify_{{ CountryCode }}_{{ product.id }}_{{ variant.id }}</g:id>
            <g:price>{{ Price | money_without_currency }} {{ shop.currency }}</g:price>
            <g:sale_price>{{ SalePrice | money_without_currency }} {{ shop.currency }}</g:sale_price>
        </item>
    {%- endif -%}
{% endfor %}
{% endfor %}
</channel>
</rss>
{% endpaginate %}

Also available on github

2. Create a new collection called “google-feed-sale-price” based on your Collection Template

  • IMPORTANT Choose xml-pricing-feed as your collection template
  • Add products to the collection (or you can create an automatic collection with Compare At Price is Greater than 1)

3. Preview the collection and copy the url.

  • Your url should look something like this: yourstoredomain.com/collections/google-feed-sale-price
  • When you preview your page, it should look like a bunch of unformatted text on your page. If you see images, then you probably skipped the first bullet point in Step 2.

Add a Supplemental Data Feed in Google Merchant Center

4. Open Merchant Center and go to
Products > Feeds > Supplemental Feeds > Add Supplemental Feed

  • Name: Sale Pricing Update
  • Feed Type: Scheduled Fetch
  • File Name: google-feed-sale-price
  • File Url: yourstoredomain.com/collections/google-feed-sale-price

Leave everything else as default values and click Continue

5. Make sure there’s a checkmark beside Content API and click Create Feed

6. You should now see your newly created feed in the Supplemental Feeds section. Click on your feed’s name and then click on Fetch Now to update pricing data immediately.

Done

It may take up to 30 minutes for your main feed to be updated. Any new sale pricing will now be uploaded once per day.

Related Reading